SnapRAID Upgrade Drive
This is a guide on how to upgrade a hard drive in a SnapRAID array. The overall system is running Open Media Vault (OMV) and MergerFS. Both MergerFS and SnapRAID are running as Open Media Vault Extras Plugins.
This guide assumes:
- Your system is running well and there are no serious issues
- No drives are failing or near failure
- You have terminal access to the OMV system
Be warned, the whole process might take many hours if not days! Primarily due to the data copy phase, this process takes me about 2 days to complete with 90% full 4 TB drives being upgraded to 8 TB drives.
I typically try to time everything so the copy, and sync tasks happen overnight. Regardless, don’t expect to complete this guide in one sitting. I highly suggest skimming through it once before starting.
The performance of the copy process is dependent on the storage medium, and interconnect between the storage and system. The performance of the sync process is dependent on the same factors and the single core performance of the CPU in the OMV system.
I use a mix of HGST and Western Digital white label, typically enterprise grade drives. These are connected by SATA to a LSI HBA card in an appropriate PCIe slot on the motherboard.
When I’m transferring data from the old drive to the new drive, the new drive is typically in an external USB dock. I also test the drive while docked. USB 3.0 is technically capable of 5Gbs speeds but with the overhead of USB vs SATA the real world performance might be lower. Either way you should try and test your self if putting the hard drive internally and connecting it with SATA increases performance. The difference might not be worth the work to setup an internal drive temporarily.
Required Software
OMV Plugins
- SnapRAID
- MergerFS
Linux Software
Hardware Setup
The new drive should be connected to the system running OMV, SATA would be preferable but USB 3.0 will work, ideally at least USB 3.0 for the sake of time. Anything faster than USB 3.0’s 5Gbs is not necessary as most Hard Drives will not be able to saturate USB 3.0. I use this external USB 3.0 Disk Dock.
Identify the Hard Drive you want to replace in your array. If the hardware you’re using has activity lights for each drive, you can usually trigger the light with various methods. Business/Server grade hardware might have a special command to identify the drive using these lights. If you’re using off the shelf hardware, or the hardware doesn’t support identify commands, you can use dd carefully to cause activity on the disk and trigger the light.
The new drive should be the same size or larger than the old drive. A smaller new drive is not supported by this guide!
Review the code below before running it!
dd if=/dev/sda of=/dev/null count=5000- dd
- Command line utility for low-level data copy and convert functions.
- if
- Input file, in this case the device path of the drive being replaced.
- of
- Output file,
/dev/null, a null device since we don’t need to do anything with the data. - count
- Number of blocks to run, this gives a limit so the command doesn’t run forever by accident.
The previous command will run a lot of reads on the drive you picked. If you’re not sure of what drive to run this on, continue reading.
Identify Drive To Replace
OMV makes it very easy to identify which drive you want to replace. The “File Systems” page in the “Storage” section of the left-hand menu is a good place to start.

Review the drives in the “File Systems” table. The “Device” column has the paths to the partitions on your drives. The first part of this path should be the path to the drive. For instance a row where the “Device” column’s path is /dev/sda1 points to the first partition on the drive at /dev/sda.
Read the previous paragraph again, mixing up the partition path with the drive path is a common mistake. In most cases your commands are going to use the partition path, dev/sda1, dev/sdb1, etc. Typically if the path ends in a number it’s a partition path.

You should see the same drive path in the previous dd example. Change that path as needed, based on what you identified in the “File Systems” table.
In addition to the drive device and partition paths, you need to know the mount path of the file system. You can find the mount path in the “Mount Point” column in the “File Systems” table, it might be hidden. In the previous image, the partition at /dev/sda1, which belongs to the drive /dev/sda is mounted at the path /srv/dev-disk-by-uuid-98049d61-1c9b-4ec1-a698-0c2c1308a573. Save the partition path and mount point path somewhere as its important information we’ll need later.
Another way to find drive information is through the OMV CLI. OMV is built on Debian so you can usually find information on how to find drive information easily. For example, the command lsblk will list all block devices available to the system.
gravee@omv:~$ lsblk
NAME        MAJ:MIN RM  SIZE RO TYPE  MOUNTPOINTS
sda           8:0    0  7.3T  0 disk
└─sda1        8:1    0  7.3T  0 part  /srv/dev-disk-by-uuid-98049d61-1c9b-4ec1-a698-0c2c1308a573
sdb           8:16   0   64G  0 disk
├─sdb1        8:17   0  512M  0 part  /boot/efi
├─sdb2        8:18   0 62.5G  0 part  /
└─sdb3        8:19   0  976M  0 part  [SWAP]
In the previous example, you can see similar information as what’s shown in OMV’s “File System” table.
This guide will continue to use /dev/sda as the “drive to replace”. Please make sure to review all commands before running them, /dev/sda could be the wrong drive, at worst an important drive in your system. There’s no telling because Linux assigns these paths randomly at startup. The only path that will stay constant in your system is the “Mount Point” path, as long as you haven’t unmounted and remounted the drive while in the middle of this guide.
Configure New Drive
This section is going to be accomplished from the OMV web gui. Its possible to do all these steps through terminal, but doing them through the OMV web gui will make sure everything is named and mounted properly for the rest of the guide.
Attach the new drive to the system running OMV. If you’re putting the drive inside a case, take note of the model number and serial number. Taking a picture of the drive’s label is another option.
The new disk should show up in OMV’s “Disks” page in the “Storage” section.

In the previous example, a drive with model number WDC WD30EZRX-00DC0B0 and serial number WD-WCC1T1273341 shows up under the path /dev/sdt. The capacity is also shown as 2.3TiB.
The three icons at the top are for:
- Editing the selected drive’s configuration.
- Wiping the selected drive.
- Refreshing the drive table.
The new drive shouldn’t have any existing partitions or data. It is possible to add a drive with existing data, but that process is not covered in this guide.
Make sure the new drive is selected, its row will be highlighted in yellow.
Click the wipe button to start the process of setting up the drive.

You will be presented with a confirmation dialog box to wipe the drive. Select the “Confirm” check box and click “Yes” to begin the process.

Next you will be shown a dialog box to select what method to use to when wiping, “Quick” or “Secure”.
- Quick
- Clears the partition tables, signatures, and beginning of the disk. Faster, but doesn’t physically remove the data that was written to the drive before.
- Secure
- Writes to every block on the drive using the
shredcommand, effectively wiping all data on the drive. Will be significantly longer, and the time increases depending on size of the drive.
Since this is a new drive, and we’ll be writing a lot of data to it during the copy process, a quick wipe is good enough.

The quick wipe process will end with a message similar to the previous screenshot.
Create New File System
With the drive wiped, it’s ready for a file system.
Head back to the “File System” page in the “Storage” section.
Press the button to create and mount a new file system.

The dropdown gives you a small selection of file systems. SnapRAID provides recommendations for various file systems and when to use them.
- Btrfs
- A relatively new file system with advanced features. SnapRAID can use Btrfs for data or parity drives, as long as SnapRAID is built with
libblkidfor UUID support. - ext3
- A journaled file system that used to be the default for popular Linux distributions. Not recommended now unless absolutely necessary as ext4 has significant improvements. SnapRAID cannot use ext3 for parity drives.
- ext4
- The current default file system for many popular Linux distributions such as Debian and Ubuntu. SnapRAID can use it for both data and parity drives as long as any single data disk isn’t larger than 16TB. This is because the parity data is stored as one large file, and ext4 does not support files larger than 16TB.
- F2FS
- A relatively new file system designed for NAND flash memory, such as SD cards and SSDs. SnapRAID doesn’t have anything to say about this file system, its probably best not to use it until there’s more information about how it works with SnapRAID.
- JFS
- A much older file system by IBM, it performs well on Linux but
ext4does outperform it in general, and has better support. SnapRAID doesn’t recommend using it for parity drives, but should be fine for data drives. - XFS
- A high performance file system created by SGI. Should be fine to use as data or parity in SnapRAID. In general its better when many users or processes access files on a single disk.
I prefer to use ext4 for both data and parity, but based on the SnapRAID FAQ XFS seems like the best alternative option in a Linux environment with a prebuilt SnapRAID executable. ext4 has a hard limit due to it’s file size limit. Once any one of the data drives grows beyond 16TB another file system will be needed for the parity drives.

Once you select the file system, you’ll be given a dialog box to select the device to create the file system on. As the warning states, if the device already has a file system or wasn’t wiped properly it will not appear in the drop down. Its also a good idea to not have other empty drives in the same system. Its way easier to keep track of things if you do them one drive at a time.
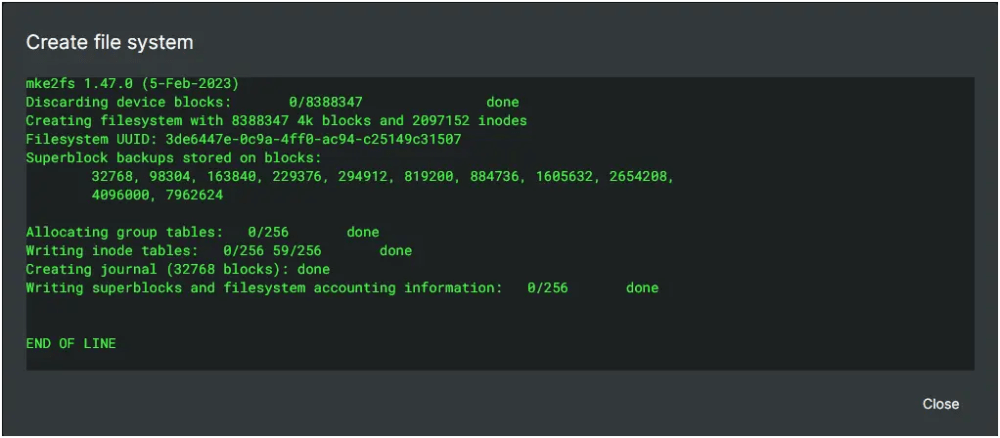
Once the file system has been created on the drive, you will see output similar to the previous screenshot.

Next you need to mount the new file system. If the new file system or partition isn’t selected, use the first drop down menu to select the file system you created in the previous step.
You can also set an out of space warning threshold here. In this case I have the feature turned off.
Tags are useful to keep track of information about disks. In this case a data tag is applied to all drives intended to be data drives in the SnapRAID array. I also name my disks with a x000 format where the first letter is either ‘d’ for data disks or ‘p’ for parity disks. You can use any system that works for you when it comes to tags and drive names.
Once the file system has been created and mounted, you should see it in the table. Take note of the path and mount point just like we did earlier for the ‘source’ drive.
STOP ALL WRITES TO ARRAY
Before you go any further, you should ensure anything that writes to the array is stopped. Reads are fine, so you can keep your media server running, as long as its not modifying anything on the array. This is important because the next few steps are reliant on nothing changing on the drive that is being replaced.
This is extra important on large drives, anything over 8TB could take more than 24 hours to complete the steps below. In that time if any files are changed on the old drive, then you could end up with unsynced files, or duplicate files. These aren’t the end of the world though, it’s possible to fix these issues later on, but it’s an annoying process that’s going to take up more time.
This is also a good time to turn off any scheduled tasks you’ve setup in OMV, or within Linux. Specifically, in OMV there should be a scheduled task to run the SnapRAID diff and sync commands. You don’t want this to run while you’re making changes to the array.

The previous screenshot is an example of the SnapRAID scheduled task that should be setup in OMV. Make sure its turned off.
If you have this script running by another method, or anything else setup to automatically makes changes to or write to any of the drives on the array, make sure to turn them all off!
Verify SnapRAID Array Status
At this point you’re ready to move data from the old drive to the new drive, but before you do that it’s a good idea to verify the state of your SnapRAID array. It’s possible to do this from the OMV Web GUI, but I will also provide the terminal commands. With the latest version of OMV 7 and SnapRAID you need to specify the path to the SnapRAID config because its possible to have multiple SnapRAID arrays in OMV and each one has its own config.
Web GUI
Navigate to “Services” -> “SnapRAID” -> “Arrays”, using the leftmost navigation menu. You should see a list of your SnapRaid arrays, typically there will only be one, but there might be more.

Figure out which array the disk you’re replacing belongs to, then click the icon. In the menu that opens, click “Status” to get the array’s status.

Self test...
Loading state from /srv/dev-disk-by-uuid-657b8259-e31e-4bbc-8e65-1364f945e5bf/snapraid.content...
Using 5323 MiB of memory for the file-system.
SnapRAID status report:

   Files Fragmented Excess  Wasted  Used    Free  Use Name
            Files  Fragments  GB      GB      GB
   16638    2045    6698   -41.3    6870    1022  87% d001
   22643    1583    5738   -61.8    6902     969  87% d002
   11102    1725    5093   -21.0    6919     995  87% d003
   31382    2003    7131   -36.1    7000     894  88% d004
   24635    1474    5287   -30.7    6980     923  88% d006
   29944    1983    6448   -83.4    5812    2035  74% d007
    6930     497    1585       -    3349     555  85% d008
    4608     744    2360       -    3369     551  85% d009
    4903     854    2948       -    3592     334  91% d010
   32319    1389    9561       -    3582     345  91% d011
   24922    1799    5367   -21.1    6702    1209  84% d012
   16535    3287    9862   -39.3    6857    1038  86% d013
   16315    2215    7126   -31.2    7200     703  91% d014
   17145    2377    7039   -42.1    6815    1077  86% d005
 --------------------------------------------------------------------------
  260021   23975   82243     0.0   81957   12655  86%


 97%|*
    |*
    |*
    |*
    |*
    |*
    |*
 48%|*
    |*
    |*
    |*
    |*
    |*
    |*
  0%|*__________________________o_____________o_____________o_____________o
     2                    days ago of the last scrub/sync                 0

The oldest block was scrubbed 2 days ago, the median 2, the newest 0.

WARNING! The array is NOT fully synced.
You have a sync in progress at 99%.
The 3% of the array is not scrubbed.
You have 793 files with zero sub-second timestamp.
Run the 'touch' command to set it to a not zero value.
No rehash is in progress or needed.
No error detected.
In my case a sync was in progress when I ran this command. If you see a similar WARNING!, then wait until the sync has completed before moving forward.
Once you’re sure all running SnapRAID tasks have completed, you can try any additional recommendations from the output of the “status” command. In the previous example 793 files don’t have sub-second timestamps, which SnapRAID uses to figure out what files need their parity data updated. The next line recommends running the touch command to fix those files.
Unfortunately, its not possible to run a touch command from the OMV UI when this guide was made. If you want to run touch, scroll down to the terminal section.
Another useful command to run at this point is “check”. This command will verify all files and parity data in the array. It’s a good way to simulate recovering data across the whole array. This process can take a very very long time, increasing with the amount of data on the array.
You can run the command from the same arrays page. Click the icon and you’ll see the ‘Check’ command in the tools menu. Remember, check is basically restoring your whole array, it will take a VERY long time! Starting this through the Web GUI is not a good idea.
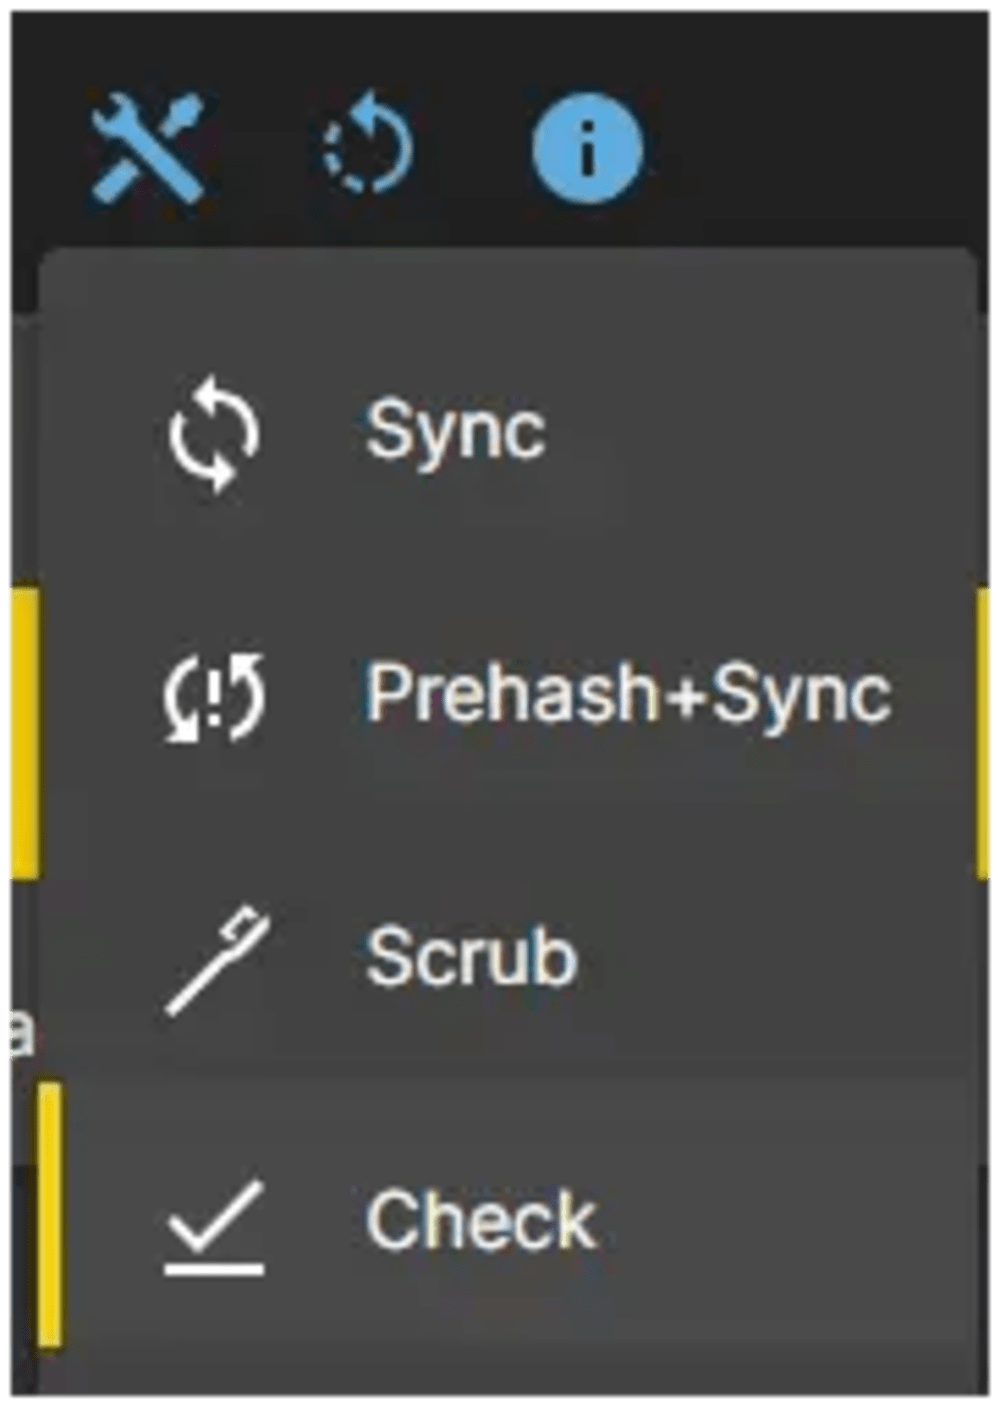
Once you’ve verified everything is okay, you can run the “diff” command. You should run this again even if a sync was running earlier because files could’ve changed after that sync started.
The “diff” and “sync” commands are in the same tools menu as the “check” command.
If a sync was run recently, then this shouldn’t take too long. On the other hand, if you haven’t had a recent sync and lots of file changes, then this could take a long time to complete.
Loading state from /srv/dev-disk-by-uuid-657b8259-e31e-4bbc-8e65-1364f945e5bf/snapraid.content...
Comparing...
add Documents/documents/originals/0000221.pdf
add Documents/documents/thumbnails/0000226.webp
add Documents/documents/thumbnails/0000224.webp
add Documents/documents/archive/0000223.pdf
add Documents/documents/originals/0000222.pdf
add Documents/documents/archive/0000221.pdf
add Documents/documents/archive/0000226.pdf
add Documents/documents/originals/0000224.pdf
add Documents/documents/archive/0000222.pdf
add Documents/documents/archive/0000224.pdf
add Documents/documents/originals/0000223.pdf
add Documents/documents/originals/0000226.pdf
add Documents/documents/thumbnails/0000223.webp
add Documents/documents/thumbnails/0000225.webp
add Documents/documents/originals/0000225.pdf
add Documents/documents/thumbnails/0000227.webp
...
...

  259999 equal
      35 added
      19 removed
       4 updated
       0 moved
       0 copied
       0 restored
There are differences!
The command’s output will look something like the previous example. If differences are found, you will need to run a “sync” so that any newly added files will be protected by parity data.
Self test...
Loading state from /srv/dev-disk-by-uuid-657b8259-e31e-4bbc-8e65-1364f945e5bf/snapraid.content...
Scanning...
Scanned d007 in 5 seconds
Scanned d005 in 6 seconds
Scanned d011 in 11 seconds
Scanned d001 in 11 seconds
Scanned d010 in 11 seconds
Scanned d008 in 11 seconds
Scanned d014 in 11 seconds
Scanned d002 in 12 seconds
Scanned d012 in 12 seconds
Scanned d006 in 13 seconds
Scanned d009 in 13 seconds
Scanned d013 in 21 seconds
Scanned d003 in 23 seconds
Scanned d004 in 28 seconds
Using 5374 MiB of memory for the file-system.
Initializing...
Resizing...
Saving state to /srv/dev-disk-by-uuid-657b8259-e31e-4bbc-8e65-1364f945e5bf/snapraid.content...
Saving state to /srv/dev-disk-by-uuid-e17c5acb-632f-4fd7-b6be-82775511ace0/snapraid.content...
Saving state to /srv/dev-disk-by-uuid-97a7e7b6-d9f9-4357-9fde-8c809711d917/snapraid.content...
Saving state to /srv/dev-disk-by-uuid-03db52c8-c739-494b-b96f-37f53354b185/snapraid.content...
Saving state to /srv/dev-disk-by-uuid-2e36a782-739c-4901-b923-db419767d974/snapraid.content...
Saving state to /srv/dev-disk-by-uuid-ad2f3f88-f67b-46dc-8732-a6c53963cc89/snapraid.content...
Saving state to /srv/dev-disk-by-uuid-b90366a7-6fea-4a00-b18c-0b67ce756d97/snapraid.content...
Saving state to /srv/dev-disk-by-uuid-5712d8c8-09ba-41d8-b9b7-798642b87770/snapraid.content...
Saving state to /srv/dev-disk-by-uuid-907a124e-7a2b-4b94-8dbf-a79179e25a0c/snapraid.content...
Saving state to /srv/dev-disk-by-uuid-c1051291-a5bf-42e6-93a9-8d541f08aebb/snapraid.content...
Saving state to /srv/dev-disk-by-uuid-d319665b-3629-4069-86d1-50ded628532f/snapraid.content...
Saving state to /srv/dev-disk-by-uuid-98049d61-1c9b-4ec1-a698-0c2c1308a573/snapraid.content...
Saving state to /srv/dev-disk-by-uuid-e0985793-e695-4008-8cc5-255be3783ebb/snapraid.content...
Saving state to /srv/dev-disk-by-uuid-0c4711de-b5ac-44d5-9c2d-98445e9d4a20/snapraid.content...
Verifying...
Verified /srv/dev-disk-by-uuid-ad2f3f88-f67b-46dc-8732-a6c53963cc89/snapraid.content in 27 seconds
Verified /srv/dev-disk-by-uuid-e17c5acb-632f-4fd7-b6be-82775511ace0/snapraid.content in 27 seconds
Verified /srv/dev-disk-by-uuid-d319665b-3629-4069-86d1-50ded628532f/snapraid.content in 27 seconds
Verified /srv/dev-disk-by-uuid-03db52c8-c739-494b-b96f-37f53354b185/snapraid.content in 29 seconds
Verified /srv/dev-disk-by-uuid-97a7e7b6-d9f9-4357-9fde-8c809711d917/snapraid.content in 29 seconds
Verified /srv/dev-disk-by-uuid-98049d61-1c9b-4ec1-a698-0c2c1308a573/snapraid.content in 31 seconds
Verified /srv/dev-disk-by-uuid-2e36a782-739c-4901-b923-db419767d974/snapraid.content in 32 seconds
Verified /srv/dev-disk-by-uuid-657b8259-e31e-4bbc-8e65-1364f945e5bf/snapraid.content in 32 seconds
Verified /srv/dev-disk-by-uuid-e0985793-e695-4008-8cc5-255be3783ebb/snapraid.content in 34 seconds
Verified /srv/dev-disk-by-uuid-c1051291-a5bf-42e6-93a9-8d541f08aebb/snapraid.content in 34 seconds
Verified /srv/dev-disk-by-uuid-5712d8c8-09ba-41d8-b9b7-798642b87770/snapraid.content in 35 seconds
Verified /srv/dev-disk-by-uuid-907a124e-7a2b-4b94-8dbf-a79179e25a0c/snapraid.content in 41 seconds
Verified /srv/dev-disk-by-uuid-0c4711de-b5ac-44d5-9c2d-98445e9d4a20/snapraid.content in 43 seconds
Verified /srv/dev-disk-by-uuid-b90366a7-6fea-4a00-b18c-0b67ce756d97/snapraid.content in 44 seconds
Using 256 MiB of memory for 64 cached blocks.
Selecting...
Syncing...

     d001  0% |
     d002  0% |
     d003  2% | *
     d004  2% | *
     d006  0% |
     d007  2% | *
     d008 18% | **********
     d009  2% | *
     d010  0% |
     d011  1% |
     d012 11% | ******
     d013  0% |
     d014  0% |
     d005  5% | ***
   parity  0% |
 2-parity 16% | *********
     raid 14% | ********
     hash 18% | **********
    sched  1% | *
     misc  0% |
              |____________________________________________________________
                            wait time (total, less is better)


      20 file errors
       0 io errors
       0 data errors
WARNING! Unexpected file errors!
Saving state to /srv/dev-disk-by-uuid-657b8259-e31e-4bbc-8e65-1364f945e5bf/snapraid.content...
Saving state to /srv/dev-disk-by-uuid-e17c5acb-632f-4fd7-b6be-82775511ace0/snapraid.content...
Saving state to /srv/dev-disk-by-uuid-97a7e7b6-d9f9-4357-9fde-8c809711d917/snapraid.content...
Saving state to /srv/dev-disk-by-uuid-03db52c8-c739-494b-b96f-37f53354b185/snapraid.content...
Saving state to /srv/dev-disk-by-uuid-2e36a782-739c-4901-b923-db419767d974/snapraid.content...
Saving state to /srv/dev-disk-by-uuid-ad2f3f88-f67b-46dc-8732-a6c53963cc89/snapraid.content...
Saving state to /srv/dev-disk-by-uuid-b90366a7-6fea-4a00-b18c-0b67ce756d97/snapraid.content...
Saving state to /srv/dev-disk-by-uuid-5712d8c8-09ba-41d8-b9b7-798642b87770/snapraid.content...
Saving state to /srv/dev-disk-by-uuid-907a124e-7a2b-4b94-8dbf-a79179e25a0c/snapraid.content...
Saving state to /srv/dev-disk-by-uuid-c1051291-a5bf-42e6-93a9-8d541f08aebb/snapraid.content...
Saving state to /srv/dev-disk-by-uuid-d319665b-3629-4069-86d1-50ded628532f/snapraid.content...
Saving state to /srv/dev-disk-by-uuid-98049d61-1c9b-4ec1-a698-0c2c1308a573/snapraid.content...
Saving state to /srv/dev-disk-by-uuid-e0985793-e695-4008-8cc5-255be3783ebb/snapraid.content...
Saving state to /srv/dev-disk-by-uuid-0c4711de-b5ac-44d5-9c2d-98445e9d4a20/snapraid.content...
Verifying...
Verified /srv/dev-disk-by-uuid-03db52c8-c739-494b-b96f-37f53354b185/snapraid.content in 26 seconds
Verified /srv/dev-disk-by-uuid-e17c5acb-632f-4fd7-b6be-82775511ace0/snapraid.content in 26 seconds
Verified /srv/dev-disk-by-uuid-d319665b-3629-4069-86d1-50ded628532f/snapraid.content in 26 seconds
Verified /srv/dev-disk-by-uuid-98049d61-1c9b-4ec1-a698-0c2c1308a573/snapraid.content in 27 seconds
Verified /srv/dev-disk-by-uuid-97a7e7b6-d9f9-4357-9fde-8c809711d917/snapraid.content in 27 seconds
Verified /srv/dev-disk-by-uuid-657b8259-e31e-4bbc-8e65-1364f945e5bf/snapraid.content in 29 seconds
Verified /srv/dev-disk-by-uuid-c1051291-a5bf-42e6-93a9-8d541f08aebb/snapraid.content in 31 seconds
Verified /srv/dev-disk-by-uuid-e0985793-e695-4008-8cc5-255be3783ebb/snapraid.content in 32 seconds
Verified /srv/dev-disk-by-uuid-ad2f3f88-f67b-46dc-8732-a6c53963cc89/snapraid.content in 32 seconds
Verified /srv/dev-disk-by-uuid-2e36a782-739c-4901-b923-db419767d974/snapraid.content in 34 seconds
Verified /srv/dev-disk-by-uuid-5712d8c8-09ba-41d8-b9b7-798642b87770/snapraid.content in 39 seconds
Verified /srv/dev-disk-by-uuid-0c4711de-b5ac-44d5-9c2d-98445e9d4a20/snapraid.content in 46 seconds
Verified /srv/dev-disk-by-uuid-907a124e-7a2b-4b94-8dbf-a79179e25a0c/snapraid.content in 46 seconds
Verified /srv/dev-disk-by-uuid-b90366a7-6fea-4a00-b18c-0b67ce756d97/snapraid.content in 48 seconds
If you see WARNING!s in the output, review any suggestions or double check that nothing is writing to the array. In the previous example, files were modified during the sync which caused 20 file errors. Fix any errors before moving forward. After every fix run the “diff” and “sync” commands in order.
File errors due to file changes are okay during typical, scheduled runs. You will see warnings and errors in the SnapRAID logs but the next sync run will capture the changes.
Run a “diff” again, if it says “No differences were found!” then you’re good to proceed to the Copy Data step.
Terminal
This section is the same process as the previous section, but using the CLI. You can skip this section if you’ve already completed the previous section.
First, find the full path for your SnapRAID array’s config. Remember this is only necessary with OMV 7 or later, OMV 6 and earlier versions didn’t create separate arrays with unique configs.
Access your OMV install over SSH, make sure the user you login with is capable of running sudo.
The config files should be in the folder /etc/snapraid/. List the files in the folder using ls.
gravee@omv:~$ ls -halt /etc/snapraid/
total 28K
drwxr-xr-x 114 root root  12K Jul 15 10:32 ..
drwxr-xr-x   2 root root 4.0K Jul  1 11:23 .
lrwxrwxrwx   1 root root   68 Jul  1 11:23 Storage.conf -> /etc/snapraid/omv-snapraid-5be02942-5ac0-467e-9bce-f323090e174d.conf
-rw-r--r--   1 root root 4.6K Jul  1 11:23 omv-snapraid-5be02942-5ac0-467e-9bce-f323090e174d.conf
There should be at least two files in this folder, one file should have the name of the SnapRAID array as you’ve set in OMV. The other file should look almost like gibberish. The key here, which is revealed by running ls with the flag -l, is that Storage.conf is a symbolic link to the adjacent conf file. What that means is both of these files are effectively the same data, and either one can be used in subsequent commands to SnapRAID. For the rest of this guide the SnapRAID array name will be ‘Storage’.
You can verify the path by running a Snapraid status command, which will print a summary about the SnapRAID array.
sudo snapraid status -c /etc/snapraid/Storage.confThe output of the command will look something like…
Self test...
Loading state from /srv/dev-disk-by-uuid-657b8259-e31e-4bbc-8e65-1364f945e5bf/snapraid.content...
Using 5323 MiB of memory for the file-system.
SnapRAID status report:

   Files Fragmented Excess  Wasted  Used    Free  Use Name
            Files  Fragments  GB      GB      GB
   16638    2045    6698   -41.3    6870    1022  87% d001
   22643    1583    5738   -61.8    6902     969  87% d002
   11102    1725    5093   -21.0    6919     995  87% d003
   31382    2003    7131   -36.1    7000     894  88% d004
   24635    1474    5287   -30.7    6980     923  88% d006
   29944    1983    6448   -83.4    5812    2035  74% d007
    6930     497    1585       -    3349     555  85% d008
    4608     744    2360       -    3369     551  85% d009
    4903     854    2948       -    3592     334  91% d010
   32319    1389    9561       -    3582     345  91% d011
   24922    1799    5367   -21.1    6702    1209  84% d012
   16535    3287    9862   -39.3    6857    1038  86% d013
   16315    2215    7126   -31.2    7200     703  91% d014
   17145    2377    7039   -42.1    6815    1077  86% d005
 --------------------------------------------------------------------------
  260021   23975   82243     0.0   81957   12655  86%


 97%|*
    |*
    |*
    |*
    |*
    |*
    |*
 48%|*
    |*
    |*
    |*
    |*
    |*
    |*
  0%|*__________________________o_____________o_____________o_____________o
     2                    days ago of the last scrub/sync                 0

The oldest block was scrubbed 2 days ago, the median 2, the newest 0.

WARNING! The array is NOT fully synced.
You have a sync in progress at 99%.
The 3% of the array is not scrubbed.
You have 793 files with zero sub-second timestamp.
Run the 'touch' command to set it to a not zero value.
No rehash is in progress or needed.
No error detected.
In my case a sync was in progress when I ran this command. If you see a similar WARNING!, then wait until the sync has completed before moving forward.
Once you’re sure any running SnapRAID tasks have completed, you can try any additional recommendations from the output of the status command. In the previous example 793 files don’t have sub-second timestamps, which SnapRAID uses to figure out what files need their parity data updated. The next line recommends running the touch command to fix those files.
sudo snapraid touch -c /etc/snapraid/Storage.confAnother useful command to run at this point is check. This command will verify all files and parity data in the array. It’s a good way to simulate recovering data across the whole array. This process can take a very very long time, increasing with the amount of data on the array.
sudo snapraid check -c /etc/snapraid/Storage.confOnce you’ve verified everything is okay, you can run the diff command. You should run this again even if a sync was running earlier because files could’ve changed after that sync started.
sudo snapraid diff -c /etc/snapraid/Storage.confIf a sync was run recently, then this shouldn’t take too long. On the other hand, if you haven’t had a recent sync and lots of file changes, then this could take a long time to complete.
Loading state from /srv/dev-disk-by-uuid-657b8259-e31e-4bbc-8e65-1364f945e5bf/snapraid.content...
Comparing...
add Documents/documents/originals/0000221.pdf
add Documents/documents/thumbnails/0000226.webp
add Documents/documents/thumbnails/0000224.webp
add Documents/documents/archive/0000223.pdf
add Documents/documents/originals/0000222.pdf
add Documents/documents/archive/0000221.pdf
add Documents/documents/archive/0000226.pdf
add Documents/documents/originals/0000224.pdf
add Documents/documents/archive/0000222.pdf
add Documents/documents/archive/0000224.pdf
add Documents/documents/originals/0000223.pdf
add Documents/documents/originals/0000226.pdf
add Documents/documents/thumbnails/0000223.webp
add Documents/documents/thumbnails/0000225.webp
add Documents/documents/originals/0000225.pdf
add Documents/documents/thumbnails/0000227.webp
...
...

  259999 equal
      35 added
      19 removed
       4 updated
       0 moved
       0 copied
       0 restored
There are differences!
The command’s output will look something like the previous example. If differences are found, you will need to run a sync so that any newly added files will be protected by parity data.
sudo snapraid sync -c /etc/snapraid/Storage.confSelf test...
Loading state from /srv/dev-disk-by-uuid-657b8259-e31e-4bbc-8e65-1364f945e5bf/snapraid.content...
Scanning...
Scanned d007 in 5 seconds
Scanned d005 in 6 seconds
Scanned d011 in 11 seconds
Scanned d001 in 11 seconds
Scanned d010 in 11 seconds
Scanned d008 in 11 seconds
Scanned d014 in 11 seconds
Scanned d002 in 12 seconds
Scanned d012 in 12 seconds
Scanned d006 in 13 seconds
Scanned d009 in 13 seconds
Scanned d013 in 21 seconds
Scanned d003 in 23 seconds
Scanned d004 in 28 seconds
Using 5374 MiB of memory for the file-system.
Initializing...
Resizing...
Saving state to /srv/dev-disk-by-uuid-657b8259-e31e-4bbc-8e65-1364f945e5bf/snapraid.content...
Saving state to /srv/dev-disk-by-uuid-e17c5acb-632f-4fd7-b6be-82775511ace0/snapraid.content...
Saving state to /srv/dev-disk-by-uuid-97a7e7b6-d9f9-4357-9fde-8c809711d917/snapraid.content...
Saving state to /srv/dev-disk-by-uuid-03db52c8-c739-494b-b96f-37f53354b185/snapraid.content...
Saving state to /srv/dev-disk-by-uuid-2e36a782-739c-4901-b923-db419767d974/snapraid.content...
Saving state to /srv/dev-disk-by-uuid-ad2f3f88-f67b-46dc-8732-a6c53963cc89/snapraid.content...
Saving state to /srv/dev-disk-by-uuid-b90366a7-6fea-4a00-b18c-0b67ce756d97/snapraid.content...
Saving state to /srv/dev-disk-by-uuid-5712d8c8-09ba-41d8-b9b7-798642b87770/snapraid.content...
Saving state to /srv/dev-disk-by-uuid-907a124e-7a2b-4b94-8dbf-a79179e25a0c/snapraid.content...
Saving state to /srv/dev-disk-by-uuid-c1051291-a5bf-42e6-93a9-8d541f08aebb/snapraid.content...
Saving state to /srv/dev-disk-by-uuid-d319665b-3629-4069-86d1-50ded628532f/snapraid.content...
Saving state to /srv/dev-disk-by-uuid-98049d61-1c9b-4ec1-a698-0c2c1308a573/snapraid.content...
Saving state to /srv/dev-disk-by-uuid-e0985793-e695-4008-8cc5-255be3783ebb/snapraid.content...
Saving state to /srv/dev-disk-by-uuid-0c4711de-b5ac-44d5-9c2d-98445e9d4a20/snapraid.content...
Verifying...
Verified /srv/dev-disk-by-uuid-ad2f3f88-f67b-46dc-8732-a6c53963cc89/snapraid.content in 27 seconds
Verified /srv/dev-disk-by-uuid-e17c5acb-632f-4fd7-b6be-82775511ace0/snapraid.content in 27 seconds
Verified /srv/dev-disk-by-uuid-d319665b-3629-4069-86d1-50ded628532f/snapraid.content in 27 seconds
Verified /srv/dev-disk-by-uuid-03db52c8-c739-494b-b96f-37f53354b185/snapraid.content in 29 seconds
Verified /srv/dev-disk-by-uuid-97a7e7b6-d9f9-4357-9fde-8c809711d917/snapraid.content in 29 seconds
Verified /srv/dev-disk-by-uuid-98049d61-1c9b-4ec1-a698-0c2c1308a573/snapraid.content in 31 seconds
Verified /srv/dev-disk-by-uuid-2e36a782-739c-4901-b923-db419767d974/snapraid.content in 32 seconds
Verified /srv/dev-disk-by-uuid-657b8259-e31e-4bbc-8e65-1364f945e5bf/snapraid.content in 32 seconds
Verified /srv/dev-disk-by-uuid-e0985793-e695-4008-8cc5-255be3783ebb/snapraid.content in 34 seconds
Verified /srv/dev-disk-by-uuid-c1051291-a5bf-42e6-93a9-8d541f08aebb/snapraid.content in 34 seconds
Verified /srv/dev-disk-by-uuid-5712d8c8-09ba-41d8-b9b7-798642b87770/snapraid.content in 35 seconds
Verified /srv/dev-disk-by-uuid-907a124e-7a2b-4b94-8dbf-a79179e25a0c/snapraid.content in 41 seconds
Verified /srv/dev-disk-by-uuid-0c4711de-b5ac-44d5-9c2d-98445e9d4a20/snapraid.content in 43 seconds
Verified /srv/dev-disk-by-uuid-b90366a7-6fea-4a00-b18c-0b67ce756d97/snapraid.content in 44 seconds
Using 256 MiB of memory for 64 cached blocks.
Selecting...
Syncing...
d001 0% |
d002 0% |
d003 2% | *
d004 2% | *
d006 0% |
d007 2% | *
d008 18% | **********
d009 2% | *
d010 0% |
d011 1% |
d012 11% | ******
d013 0% |
d014 0% |
d005 5% | ***
parity 0% |
2-parity 16% | *********
raid 14% | ********
hash 18% | **********
sched 1% | *
misc 0% |
|____________________________________________________________
wait time (total, less is better)
20 file errors
0 io errors
0 data errors
WARNING! Unexpected file errors!
Saving state to /srv/dev-disk-by-uuid-657b8259-e31e-4bbc-8e65-1364f945e5bf/snapraid.content...
Saving state to /srv/dev-disk-by-uuid-e17c5acb-632f-4fd7-b6be-82775511ace0/snapraid.content...
Saving state to /srv/dev-disk-by-uuid-97a7e7b6-d9f9-4357-9fde-8c809711d917/snapraid.content...
Saving state to /srv/dev-disk-by-uuid-03db52c8-c739-494b-b96f-37f53354b185/snapraid.content...
Saving state to /srv/dev-disk-by-uuid-2e36a782-739c-4901-b923-db419767d974/snapraid.content...
Saving state to /srv/dev-disk-by-uuid-ad2f3f88-f67b-46dc-8732-a6c53963cc89/snapraid.content...
Saving state to /srv/dev-disk-by-uuid-b90366a7-6fea-4a00-b18c-0b67ce756d97/snapraid.content...
Saving state to /srv/dev-disk-by-uuid-5712d8c8-09ba-41d8-b9b7-798642b87770/snapraid.content...
Saving state to /srv/dev-disk-by-uuid-907a124e-7a2b-4b94-8dbf-a79179e25a0c/snapraid.content...
Saving state to /srv/dev-disk-by-uuid-c1051291-a5bf-42e6-93a9-8d541f08aebb/snapraid.content...
Saving state to /srv/dev-disk-by-uuid-d319665b-3629-4069-86d1-50ded628532f/snapraid.content...
Saving state to /srv/dev-disk-by-uuid-98049d61-1c9b-4ec1-a698-0c2c1308a573/snapraid.content...
Saving state to /srv/dev-disk-by-uuid-e0985793-e695-4008-8cc5-255be3783ebb/snapraid.content...
Saving state to /srv/dev-disk-by-uuid-0c4711de-b5ac-44d5-9c2d-98445e9d4a20/snapraid.content...
Verifying...
Verified /srv/dev-disk-by-uuid-03db52c8-c739-494b-b96f-37f53354b185/snapraid.content in 26 seconds
Verified /srv/dev-disk-by-uuid-e17c5acb-632f-4fd7-b6be-82775511ace0/snapraid.content in 26 seconds
Verified /srv/dev-disk-by-uuid-d319665b-3629-4069-86d1-50ded628532f/snapraid.content in 26 seconds
Verified /srv/dev-disk-by-uuid-98049d61-1c9b-4ec1-a698-0c2c1308a573/snapraid.content in 27 seconds
Verified /srv/dev-disk-by-uuid-97a7e7b6-d9f9-4357-9fde-8c809711d917/snapraid.content in 27 seconds
Verified /srv/dev-disk-by-uuid-657b8259-e31e-4bbc-8e65-1364f945e5bf/snapraid.content in 29 seconds
Verified /srv/dev-disk-by-uuid-c1051291-a5bf-42e6-93a9-8d541f08aebb/snapraid.content in 31 seconds
Verified /srv/dev-disk-by-uuid-e0985793-e695-4008-8cc5-255be3783ebb/snapraid.content in 32 seconds
Verified /srv/dev-disk-by-uuid-ad2f3f88-f67b-46dc-8732-a6c53963cc89/snapraid.content in 32 seconds
Verified /srv/dev-disk-by-uuid-2e36a782-739c-4901-b923-db419767d974/snapraid.content in 34 seconds
Verified /srv/dev-disk-by-uuid-5712d8c8-09ba-41d8-b9b7-798642b87770/snapraid.content in 39 seconds
Verified /srv/dev-disk-by-uuid-0c4711de-b5ac-44d5-9c2d-98445e9d4a20/snapraid.content in 46 seconds
Verified /srv/dev-disk-by-uuid-907a124e-7a2b-4b94-8dbf-a79179e25a0c/snapraid.content in 46 seconds
Verified /srv/dev-disk-by-uuid-b90366a7-6fea-4a00-b18c-0b67ce756d97/snapraid.content in 48 secondsIf you see WARNING!s in the output, review any suggestions or double check that nothing is writing to the array. In the previous example, files were modified during the sync which caused 20 file errors. Fix any errors before moving forward. After every fix run the diff and sync commands in order.
File errors due to file changes are okay during typical, scheduled runs. You will see warnings and errors in the SnapRAID logs but the next sync run will capture the changes.
Run a diff again, if it says “No differences were found!” then you’re good to proceed to the next step.
Copy Data
Now you are ready to copy data over from the old drive to the new drive. We’re going to use the tool rsync because its well understood, stable, and supports preserving attributes. Before we start, we have to figure out the paths for the ‘source’ and ‘destination’ for the data. If you’ve followed this guide through completely, and kept track of previously found information, it should be easy to identify the ‘source’ and ‘destination’ paths.
Within the guide’s examples the ‘source’ is \dev\sda and the ‘destination’ is \dev\sdt. If you don’t have that information, you can find the drive path and mount point in OMV’s “File Systems” page. You can also find it through the terminal by using the command lsblk.
NAME        MAJ:MIN RM  SIZE RO TYPE  MOUNTPOINTS
sda           8:0    0  7.3T  0 disk
└─sda1        8:1    0  7.3T  0 part  /srv/dev-disk-by-uuid-98049d61-1c9b-4ec1-a698-0c2c1308a573
sdb           8:16   0   64G  0 disk
├─sdb1        8:17   0  512M  0 part  /boot/efi
├─sdb2        8:18   0 62.5G  0 part  /
└─sdb3        8:19   0  976M  0 part  [SWAP]
sdc           8:32   0  7.3T  0 disk
└─sdc1        8:33   0  7.3T  0 part  /srv/dev-disk-by-uuid-657b8259-e31e-4bbc-8e65-1364f945e5bf
sdt           8:48   0  7.3T  0 disk
└─sdt1        8:49   0  7.3T  0 part  /srv/dev-disk-by-uuid-d319665b-3629-4069-86d1-50ded628532f
The MOUNTPOINTS are what you want to use as arguments in the ‘source’ and ‘destination’ parameters for the rsync command.
The data copy process should be done through the terminal because it will be a long running process. If you’re using SSH to access the system remotely consider using screen to run the copy process in the background. This will ensure it keeps running even if your SSH session closes unexpectedly.
Modify the next command before running it!
Remember, in this guide the ‘source’ and ‘destination’ are /dev/sda and /dev/sdt respectively. From the earlier steps we found the mount points for the partitions on these drives as /srv/dev-disk-by-uuid-98049d61-1c9b-4ec1-a698-0c2c1308a573 and /srv/dev-disk-by-uuid-d319665b-3629-4069-86d1-50ded628532f respectively.
sudo rsync -avP [source] [destination]- sudo
- Runs the command with root privileges, important to ensure everything is copied off the old drive.
- rsync
- The command we’re running.
- -a
- Archive mode, a combination of multiple rsync options that follows all paths and preserves times, owners, groups, and other attributes.
- -v
- Increases verbosity or output from running the command.
- -P
- Shows a progress bar and keeps partially transferred files.
- source
- The mount path to
/dev/sda,/srv/dev-disk-by-uuid-98049d61-1c9b-4ec1-a698-0c2c1308a573/. Notice the trailing /, this is important! If you don’t include the last /rsyncwill create a folder nameddev-disk-by-uuid-d319665b-3629-4069-86d1-50ded628532fon the new drive. - destination
- The mount path to
/dev/sdt,/srv/dev-disk-by-uuid-d319665b-3629-4069-86d1-50ded628532f
The full command would look like…
sudo rsync -avP /srv/dev-disk-by-uuid-98049d61-1c9b-4ec1-a698-0c2c1308a573/ /srv/dev-disk-by-uuid-98049d61-1c9b-4ec1-a698-0c2c1308a573sending incremental file list
./
0YKqK5w0Nz.txt
1,024 100% 0.00kB/s 0:00:00 (xfr#1, to-chk=49/51)
2MTkS6qXeX.txt
1,024 100% 1000.00kB/s 0:00:00 (xfr#2, to-chk=48/51)
2tOMkrY98B.txt
1,024 100% 1000.00kB/s 0:00:00 (xfr#3, to-chk=47/51)
3AE0ShNRqp.txt
1,024 100% 1000.00kB/s 0:00:00 (xfr#4, to-chk=46/51)
3FEfToe7fH.txt
1,024 100% 1000.00kB/s 0:00:00 (xfr#5, to-chk=45/51)
7QYo4wBycm.txt
1,024 100% 1000.00kB/s 0:00:00 (xfr#6, to-chk=44/51)
7rX1Z5gi9l.txt
1,024 100% 1000.00kB/s 0:00:00 (xfr#7, to-chk=43/51)
AD5NMTVZKa.txt
1,024 100% 1000.00kB/s 0:00:00 (xfr#8, to-chk=42/51)
BFheyp95XV.txt
1,024 100% 1000.00kB/s 0:00:00 (xfr#9, to-chk=41/51)
BIXF5CZrNZ.txt
1,024 100% 1000.00kB/s 0:00:00 (xfr#10, to-chk=40/51)
C8DgOP3iTE.txt
1,024 100% 1000.00kB/s 0:00:00 (xfr#11, to-chk=39/51)
CojpL9Jxkz.txt
1,024 100% 1000.00kB/s 0:00:00 (xfr#12, to-chk=38/51)
EolqARHsVQ.txt
1,024 100% 1000.00kB/s 0:00:00 (xfr#13, to-chk=37/51)
FcY7E2o6Ki.txt
1,024 100% 1000.00kB/s 0:00:00 (xfr#14, to-chk=36/51)
GS8wxAgrmC.txt
1,024 100% 1000.00kB/s 0:00:00 (xfr#15, to-chk=35/51)
GWXenRXwY2.txt
1,024 100% 1000.00kB/s 0:00:00 (xfr#16, to-chk=34/51)
GgW495h8wV.txt
1,024 100% 1000.00kB/s 0:00:00 (xfr#17, to-chk=33/51)
HJK4EgFQNd.txt
1,024 100% 1000.00kB/s 0:00:00 (xfr#18, to-chk=32/51)
IFuMevBHJK.txt
1,024 100% 1000.00kB/s 0:00:00 (xfr#19, to-chk=31/51)
IwD4fJe5ep.txt
1,024 100% 1000.00kB/s 0:00:00 (xfr#20, to-chk=30/51)
Jr5BGPmRwc.txt
1,024 100% 1000.00kB/s 0:00:00 (xfr#21, to-chk=29/51)
KZC32xopd8.txt
1,024 100% 1000.00kB/s 0:00:00 (xfr#22, to-chk=28/51)
N54CnCN1U8.txt
1,024 100% 1000.00kB/s 0:00:00 (xfr#23, to-chk=27/51)
PP773Kg0Hu.txt
1,024 100% 1000.00kB/s 0:00:00 (xfr#24, to-chk=26/51)
SAXzhctvju.txt
1,024 100% 1000.00kB/s 0:00:00 (xfr#25, to-chk=25/51)
TXEOl81rVV.txt
1,024 100% 1000.00kB/s 0:00:00 (xfr#26, to-chk=24/51)
U105H2gorq.txt
1,024 100% 1000.00kB/s 0:00:00 (xfr#27, to-chk=23/51)
Up4YlEQeHV.txt
1,024 100% 1000.00kB/s 0:00:00 (xfr#28, to-chk=22/51)
XMLHdywWea.txt
1,024 100% 1000.00kB/s 0:00:00 (xfr#29, to-chk=21/51)
XWsthE1d5A.txt
1,024 100% 1000.00kB/s 0:00:00 (xfr#30, to-chk=20/51)
YcVNAN0lXy.txt
1,024 100% 1000.00kB/s 0:00:00 (xfr#31, to-chk=19/51)
YgXBt6dt3o.txt
1,024 100% 1000.00kB/s 0:00:00 (xfr#32, to-chk=18/51)
YjvCz1HpLt.txt
1,024 100% 1000.00kB/s 0:00:00 (xfr#33, to-chk=17/51)
ZTEwFkTxvB.txt
1,024 100% 1000.00kB/s 0:00:00 (xfr#34, to-chk=16/51)
bk7ozArRTc.txt
1,024 100% 1000.00kB/s 0:00:00 (xfr#35, to-chk=15/51)
dgDRye5EDv.txt
1,024 100% 1000.00kB/s 0:00:00 (xfr#36, to-chk=14/51)
e7wnjasAab.txt
1,024 100% 1000.00kB/s 0:00:00 (xfr#37, to-chk=13/51)
euUYFDL6Ti.txt
1,024 100% 1000.00kB/s 0:00:00 (xfr#38, to-chk=12/51)
ivdkPaE19G.txt
1,024 100% 1000.00kB/s 0:00:00 (xfr#39, to-chk=11/51)
k97lesVpvJ.txt
1,024 100% 1000.00kB/s 0:00:00 (xfr#40, to-chk=10/51)
kItaf1bZFn.txt
1,024 100% 1000.00kB/s 0:00:00 (xfr#41, to-chk=9/51)
m7jLGvr0wX.txt
1,024 100% 1000.00kB/s 0:00:00 (xfr#42, to-chk=8/51)
oy46lgdlbI.txt
1,024 100% 1000.00kB/s 0:00:00 (xfr#43, to-chk=7/51)
pJYn1dL3IS.txt
1,024 100% 1000.00kB/s 0:00:00 (xfr#44, to-chk=6/51)
sQfrpRURa5.txt
1,024 100% 1000.00kB/s 0:00:00 (xfr#45, to-chk=5/51)
tQNIPryuUZ.txt
1,024 100% 1000.00kB/s 0:00:00 (xfr#46, to-chk=4/51)
uaDjLSEAmh.txt
1,024 100% 1000.00kB/s 0:00:00 (xfr#47, to-chk=3/51)
vXwiNZzOCL.txt
1,024 100% 1000.00kB/s 0:00:00 (xfr#48, to-chk=2/51)
vhvsc7rNKS.txt
1,024 100% 1000.00kB/s 0:00:00 (xfr#49, to-chk=1/51)
zuDJNjRIAe.txt
1,024 100% 1000.00kB/s 0:00:00 (xfr#50, to-chk=0/51)
sent 54,754 bytes received 969 bytes 111,446.00 bytes/sec
total size is 51,200 speedup is 0.92The previous output is an example rsync run with 50 random files.
If you suspect files might have changed on the ‘source’ drive, you can run the same rsync command again. rsync will know what files have changed and only copy the new or changed files. If you believe files have been deleted off the ‘source’ drive, and you don’t want to recover those files, then include the flag --delete in the rsync command. Be careful when using the --delete option, it might be safer to delete any duplicate files manually at the end of this process.
Remove Old Drive
We are almost ready to remove the old drive from the system. Before that, we have to change some of the configurations within OMV. If you take the physical drive out now, you’re going to leave OMV’s web gui in a broken state.
The next few steps are going to feel like we’re making huge changes, but they’re all technically non destructive to data. All we’re doing is changing the configuration of SnapRAID and MergerFS. The SnapRAID change won’t do anything to the data as long as a ‘diff’, ‘sync’, or ‘scrub’ don’t run. This is why its important to make sure no scheduled tasks invoke SnapRAID during this time. The change to MergerFS requires a restart to be applied.
If anything goes wrong, all you should need to do is return the config to what it was before and start over. Its a good idea to take screenshots of what you see before you make any changes as a record of previous configurations. A backup of OMV is also a good idea, but not absolutely necessary.
SnapRAID
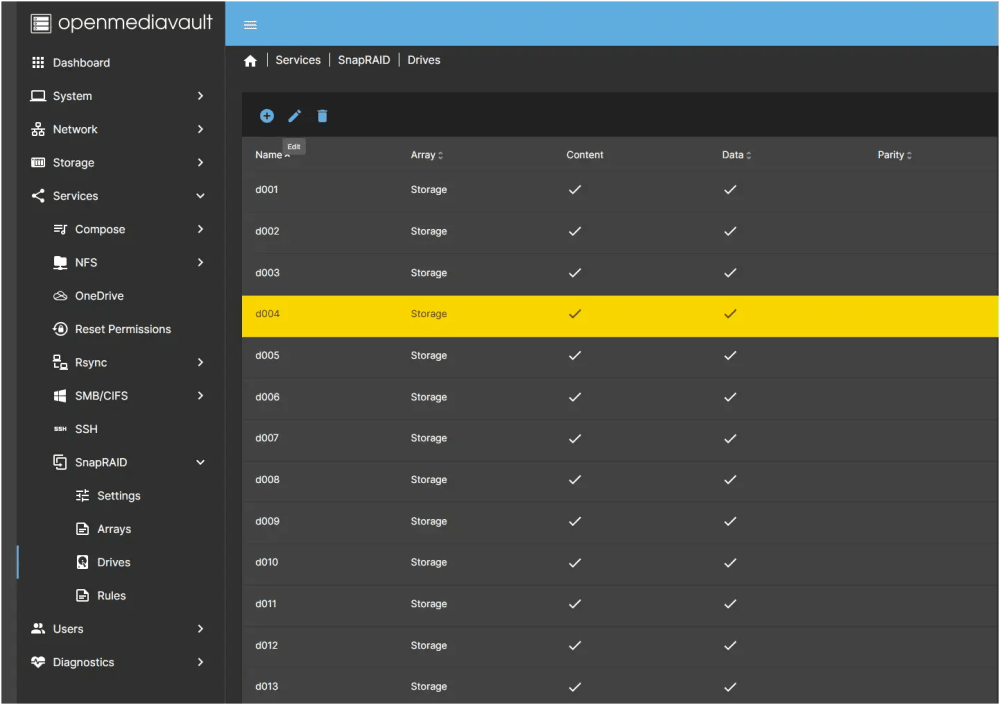
Navigate over to the SnapRAID “Drives” page, you should see a list of drives in your array. Select the drive you want to replace, then click the edit, button.

In the “Drives | Edit” page you are shown the drive path, stop here and verify if the correct drive is being removed. In the previous example the drive path is /dev/sdk1, which is not correct. Remember, this guide is using /dev/sda as the old drive, in which case the path should have been /dev/sda1.

Once you’ve found the correct drive, take note of the drive name. The replacement drive must use the same name as the old drive, if not SnapRAID will treat it like a brand new drive with new data.
Go back to the “Drives” page, select the drive name of the old drive, then click the delete, button to remove the drive from the array.
mergerfs
Navigate to the mergerfs page within the “Storage” section of the OMV menu. For this section you will need to know the mount point of the old drive.

Select the mergerfs pool with the old drive. Typically there should only be one mergerfs pool. Click the edit, button to move to the Edit page.
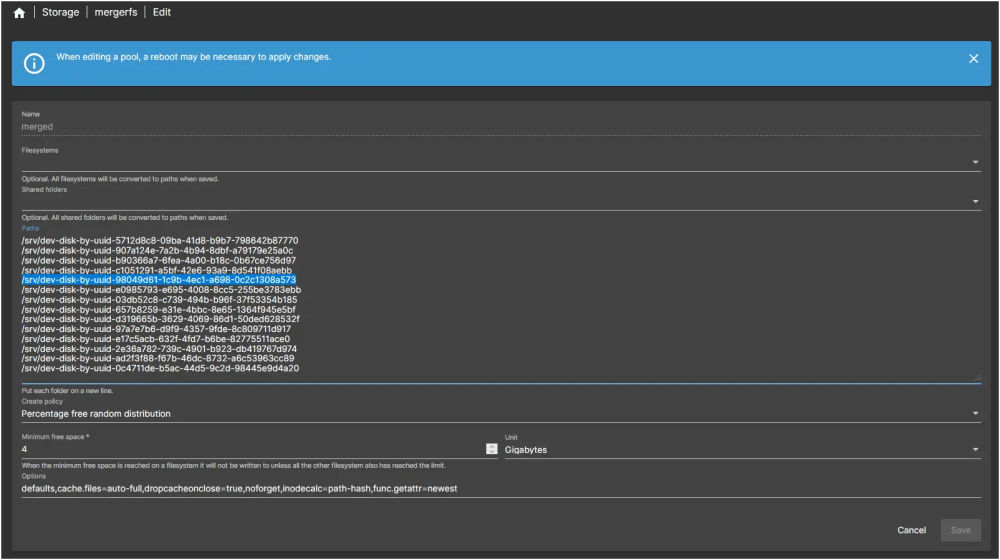
You can expand the input field “Paths” to see all the paths that form this mergerfs pool by pulling down on the lower-right corner of the field. Look through this list of the mount point of the drive you’re replacing. In this guide, that’s the drive /dev/sda mounted at /srv/dev-disk-by-uuid-98049d61-1c9b-4ec1-a698-0c2c1308a573. Highlight the path to remove, and delete the line using backspace key. Save your changes and apply the configuration.
File Systems
Navigate to the “File Systems” page in the “Storage” section and find the drive to remove.

Make sure there is no check mark in the “Referenced” column for the drive. If the check mark is still there, double check the drive’s mount point was removed from the mergerfs path configuration correctly. Once you’ve verified that, if the check mark still exists you will have to restart OMV for the mergerfs volume to be recreated.
Once the check mark is removed, you can unmount the drive by clicking the button. Verify you want to unmount the drive, then apply your configuration changes.
Get Physical
At this point it is safe to remove the physical old drive from the system. Some people prefer to do this with the system off. If you’re going to turn the system off, wait till after you do the Move New Drive step. Its also possible to ‘spin down’ some drives using the command…
sudo hdparm -Y /dev/sdaThis command is not guaranteed to work!
Move New Drive
The new drive is still mounted to the OMV system, return to the “File Systems” page, find the new drive and unmount it. These steps should be familiar since you did them recently.
At this point, if you want, shutdown the system or just OMV if its a VM. Make sure other VMs or services don’t get affected by OMV shutting down. For instance, some media server software might take extended down time of the NAS as files being deleted, and remove the media entries from their database.
Add New Drive
Return to the “File Systems” page and click on the play, button to add an existing file system.
This page should look familiar, select the existing file system on the new drive. If you don’t see a file system here, go to the “Disks” page to ensure the disk is visible to OMV. The lslbk command will help you with additional troubleshooting. If the drive doesn’t show up anywhere, try restarting again. If you still have problems, shut down and verify the drive’s cables are connected securely. You can listen for the drive starting up to make sure its powered, but you might also have drive activity lights on your case to help judge the status of the drive.
Worst case scenario you might have to start over from the Configure New Drive step. Practice makes perfect.
Do note, the drive and mount paths of the moved drive could be different from earlier. So far the guide has used the path /dev/sdt as the new drive’s path, but due to the intricacies of Linux there’s no guarantee the drive will use the same path after being moved and remounted.
Make sure to take note of the new drive path!
To save on storage space this guide reuses images, therefore the guide will continue to use /dev/sdt as the new drive path.
At this point you should take the time to record the drive path and mount path of the new drive. Remember the drive path looks like /dev/sdt and the mount path looks like /srv/dev-disk-by-uuid-98049d61-1c9b-4ec1-a698-0c2c1308a573.
If all is well, the next few steps are basically the steps from removing the old drive but backwards!
mergerfs
Navigate to the mergerfs page, and edit the pool you want to add the new drive to. Remember, I’m cheap so I’m reusing images.
Add the mount path of the new drive into the Paths text input area. You can add it anywhere, as long as every path is on its own line.
Save and apply the config change. Restart OMV here so the drive changes are applied to the pool.
SnapRAID
Navigate to the SnapRAID Drives page and click the add, button.
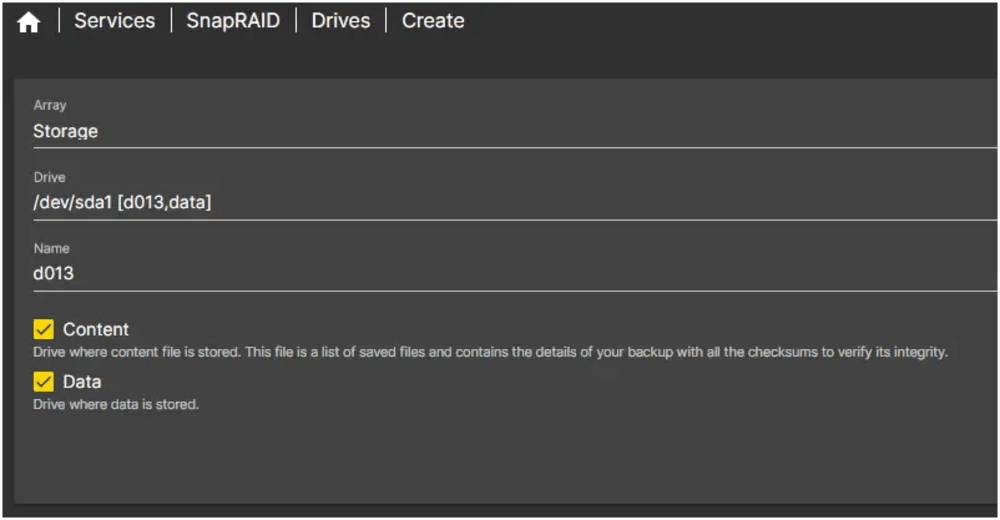
Select the new drive from the drop down, and give the drive a name. The name must be the same as the name of the old rive you removed. If you change the name here, SnapRAID will treat it like a new drive and then complain the old drive is missing.
Verify SnapRAID array
This might seem like déjà vu, but don’t worry you’re on the right track. All that is left to do is verify everything is back where it should be. Similar to before you’ll start by doing a sudo snapraid diff, but you shouldn’t see any differences.
You can do a diff from the OMV GUI too.
If there are differences, read the output preceding the summary and see what files changed and try to figure out why.
The common reasons for differences are:
- Moved data into a folder on the new drive instead of the root.
- Data was changed on the old drive and you forgot to copy the changes to the new drive.
- Data was deleted on the old drive and ‘rsync’ didn’t delete the old files from the new drive.
- SnapRAID drive name has changed.
- Wrong old drive data was copied to new drive.
Keep running ‘diff’ until the summary says no differences.
Just like that we’re done!
This whole process might’ve seemed daunting, but the main reason why this article is so long is because of all the detail. In reality, the process is relatively simple but can take a very long time to complete.
At this point you can restart any services that were writing to the array.